How to Make Chocolate Christmas Trees
10
30
10
Dessert/Treats
Christmas
Chocolate Christmas Trees: A Festive Treat for Family Fun
These chocolate Christmas trees make for an adorable, festive treat that’s easy to create with kids, perfect for decorating holiday treats or even as a stand-alone sweet treat. With a few simple ingredients, you can whip up a batch of these in no time, giving everyone a fun, hands-on activity to enjoy. The recipe is customisable too, so feel free to experiment with different chocolates and sprinkles to make each tree your own!
Why Make Chocolate Christmas Trees?
Not only are these mini chocolate trees delicious, but they’re also versatile. Here are a few ways you can use them once they’re ready:
- Cupcake Toppers: Add a festive flair to any cupcake by placing a chocolate tree on top. The bright, colourful sprinkles make these perfect for Christmas parties or family gatherings.
- Decorate a Holiday Cake: Cluster a few trees together on a cake to create a holiday forest scene. Add a few dustings of powdered sugar “snow” for an extra-special touch!
-
Serve as a Treat: Let the chocolate trees stand alone on a dessert platter for a festive snack that kids and adults alike will enjoy.
These little chocolate Christmas trees make a fantastic addition to any festive gathering and are a fun project that everyone can participate in. Plus, you don’t need advanced baking skills – all you need is creativity and a few minutes!

What You’ll Need
Before diving in, here are the essentials:
- 10 chocolate-coated biscuit sticks – something like Mikado or Pocky works well, and these are widely available in the UK.
- 150g of chocolate – We recommend milk or dark chocolate for a classic look, but feel free to get creative.
- Christmas-themed sprinkles – Green, red, and white balls or stars are a festive choice.
- 10 white chocolate stars – These will be your tree toppers.

Step-By-Step Guide to Making Chocolate Christmas Trees
1. Prepare Your Workspace Start by laying down a sheet of greaseproof paper on your workspace. This will help with easy cleanup and make it simpler to lift your chocolate trees once they’ve hardened.
2. Melt the Chocolate Break up your chocolate bar and place it in a microwave-safe bowl. Microwave in 30-second intervals, stirring each time, until fully melted. This usually takes 1–2 minutes. If the chocolate starts to cool and thicken as you work, pop it back in the microwave for a quick 30-second refresh.
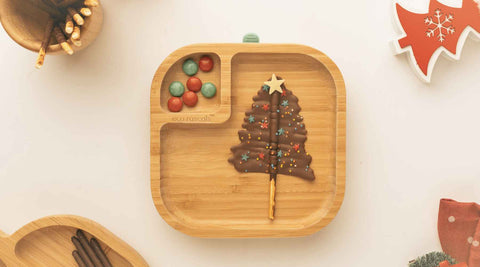
3. Get Piping Carefully pour the melted chocolate into a piping bag (or a plastic sandwich bag if you don’t have one on hand). This will give you control over the chocolate as you “draw” your trees. Lay one of your biscuit sticks on the paper, then drizzle the melted chocolate back and forth across it, starting a quarter of the way up to create a “tree” shape. Leave the bottom part bare – this is your tree trunk!
4. Decorate Your Trees Once you’re happy with your tree’s shape, sprinkle on your decorations! Christmas-themed sprinkles work best here – red, green, and white sprinkles create a beautiful effect, but feel free to add whatever sprinkles you have at home.
5. Add a Star Top each tree with a white chocolate star to give it that classic Christmas look. You can buy these stars at most supermarkets or online.
6. Set the Chocolate Trees Allow your trees to harden on the counter for about two hours or speed up the process by placing them in the fridge for 30 minutes. Once set, peel the trees off the paper carefully, and you’re ready to serve up on your favourite eco rascals bamboo plate.
Watch the How To Make Chocolate Christmas tree Video
Tips for making Chocolate Christmas Trees with kids
These chocolate trees are a fantastic project to do with kids, and they’ll love every step – from melting the chocolate to decorating with sprinkles. Here are a few tips to make it extra fun:
- Set up a “decorating station” with different types of sprinkles and decorations for your kids to choose from. Let them be creative!
- Use smaller piping bags or let them use a spoon to drizzle the chocolate. It may not be as neat, but they’ll have so much fun designing their own trees.
- Make it a gift! Once your trees are set, wrap them in cellophane bags with a ribbon for a cute, edible Christmas gift that your kids will be proud to give.
Chocolate Alternatives to Try
This recipe uses milk chocolate, but you can try these variations:
- White Chocolate Trees: White chocolate melts beautifully and, with a little green food coloring, you can create vibrant “evergreen” trees.
- Dark Chocolate Trees: For a rich, decadent option, try dark chocolate. It’s a great choice if you’re planning to use these as decorations on cakes or cupcakes.
- Dairy-Free or Vegan Chocolate: You can easily adapt this recipe by using dairy-free chocolate. Brands like Moo Free and Nomo have some delicious vegan options available in the UK.
Storing Your Chocolate Christmas Trees
Once your trees are set, you can store them in an airtight container. They’ll keep well at room temperature for about a week, but if your house is particularly warm, it’s best to store them in the fridge. Just remember to keep them in a sturdy container so they don’t break!


Comments (0)
There are no comments for this article. Be the first one to leave a message!